
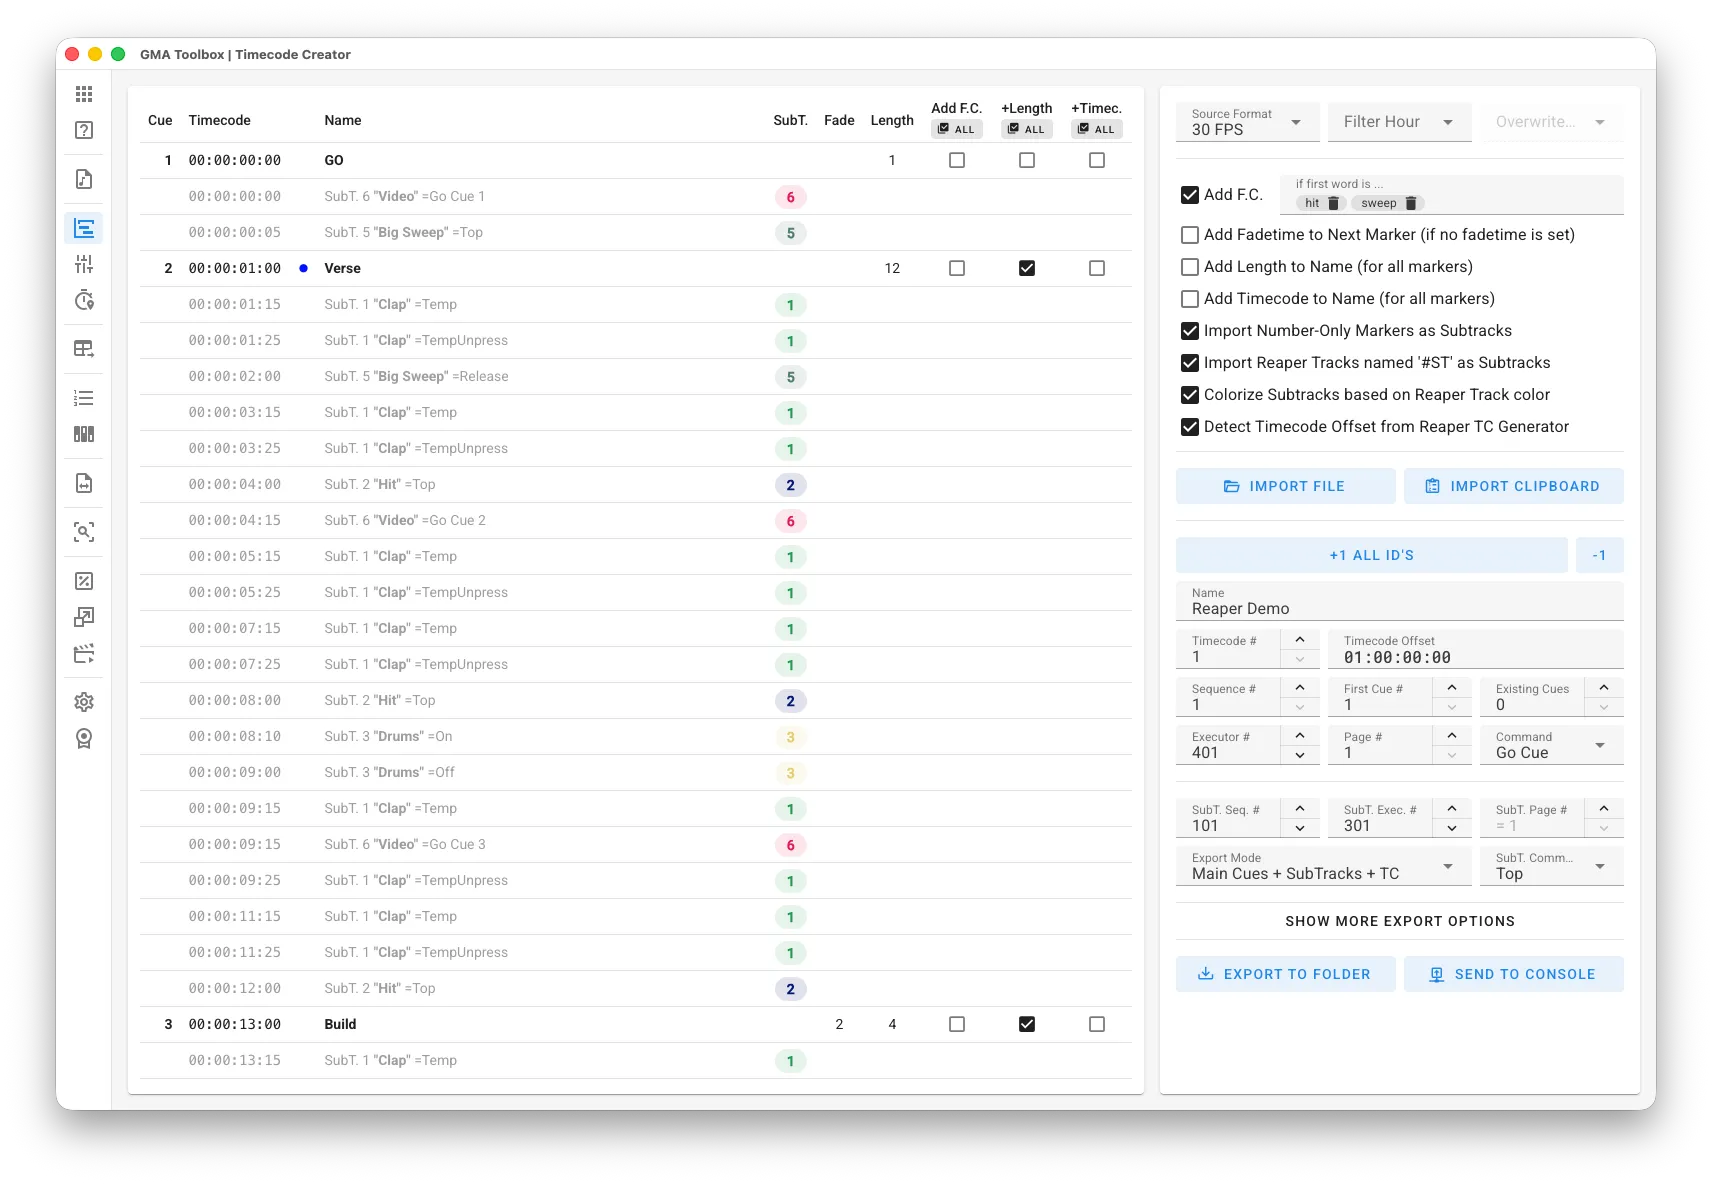
Timecode Creator
Create timecoded sequences for grandMA consoles by importing Reaper Project files or CSV marker files.
Core Capabilities
Section titled “Core Capabilities”- Convert Markers to Timecoded Cues
Transform each marker from your source file into a precise timecoded cue. - Subtrack Integration
Add button triggers (like Top, Go) using subtrack markers.
Create these subtracks through either number-only markers or dedicated Reaper tracks. - Follow-Cues, Infos and Parameters
Set fade times for each cue and create optional follow-cues for an efficient “store /cueonly” workflow.
Automatically add cue lengths and timecodes to cue names, with the option to split markers into separate name and info fields.
Step-by-Step
Section titled “Step-by-Step”- Create Markers:
- Open your audio file in your preferred editing platform (Reaper recommended).
- Place markers at precise locations.
For subtracks, either use numbered markers (e.g., “1”, “2”, …) or create Reaper tracks with “#ST” in their names. - If using software other than Reaper, export markers as CSV in “30 FPS” format for maximum precision (this prevents rounding issues, as grandMA2 operates internally at 30fps).
- Import Markers:
- Configure your preferred import options to prepare the marker-list according to your needs.
Before importing CSV files, you can configure the CSV format in the Settings page. If you’re unsure about the format, open the CSV file in a text editor to check its first line. - Use Import File to directly open a Reaper Project (.rpp) or a Comma-Separated Values file (.csv).
Alternatively, use Import Clipboard to paste data from applications such as Excel.
- Configure your preferred import options to prepare the marker-list according to your needs.
- Setup Export Parameters:
- Configure destination settings for sequences, executors, subtracks, and cues.
- Set up advanced options including follow-cue settings and info/note extraction.
- Export Timecode and Sequence:
- For manual import: Export the generated Macro and Timecode to a grandMA2 or grandMA3 folder.
- Start automatic import: Send the generated Sequence and Timecode straight to the console.
User Interface
Section titled “User Interface”Import Options
Section titled “Import Options”- Source Format: Choose the timecode format for input and export.
- Filter Hour: Select markers from a specific hour range and optionally modify the hour value.
This is useful when you have multiple audio tracks within a single timeline in your project. - Add F.C. (Follow Cue): Automatically append follow-cues for markers matching designated keywords (e.g., “hit”, “sweep”) for an efficient “store /cueonly” workflow. Use “All” (in table header) to toggle the status of currently imported items.
- Add Fadetime to Next Marker: Set fadetime to cue length for all markers without explicit fade time. Use “All” (in table header) to toggle the status of currently imported items.
- Add Length to Name: Append cue duration (time between this and next cue) to cue name. Use “All” (in table header) to toggle the status of currently imported items.
- Add Timecode to Name: Append cue timecode directly to cue name.
- Import Number-Only Markers as Subtracks: Interpret numerically labeled markers as subtracks.
- Import Reaper Tracks named ‘#ST’ as Subtracks: Recognize Reaper tracks labeled “#ST” as subtracks.
- Colorize Subtracks based on Reaper Track color: Use the assigned Reaper Track color to colorize subtracks and created buttons.
- Detect Timecode Offset from Reaper TC Generator: Detect the timecode offset when loading a Reaper file. It uses the first found LTC/MTC Generator track.
Destination Configuration
Section titled “Destination Configuration”- +1 All IDs: Automatically increment destination IDs based on the previous import.
Standard IDs increase by 1, while SubTrack IDs increase by the number of SubTracks from the last export. You can adjust these settings in the Settings page. - -1: Automatically decrease destination IDs following the same pattern as +1.
- Name: Define the name for the timecode and sequence.
This is automatically set from the imported filename. - Timecode #: Set the target timecode pool number.
- Timecode Offset: Set the timecode offset.
- Sequence #: Set the target sequence pool number.
- Executor #: Select the executor number for storing the sequence.
- Page #: Select the executor’s page location.
- First Cue #: Set the first cue number in the sequence.
- Existing Cues: How many cues are already existing in the sequence before first cue? Example: Set to “2” if cue 0.1 and 0.2 already exist. This is used for grandMA2 export only.
- Command: Choose the timecode command (“Go Cue”, “Goto”, or “Go”).
Subtrack-Specific Configuration
Section titled “Subtrack-Specific Configuration”- SubT. Seq. #: Specify the first sequence number for subtracks.
- SubT. Exec. #: Set the first executor number for subtracks.
- SubT. Page #: Set the page for subtrack executors or use main page.
- SubT. Command: Specify the command for subtracks (“Top”, “Go”, or “On”) if not set in Reaper track.
- Export Mode: Select the export mode (“Main Cues + SubTracks + ”, “Main Cues + TC Only”, “SubTracks + TC Only”, or “TC Only”).
Additional Export Configuration
Section titled “Additional Export Configuration”- F.C. Time: Configure the delay for follow-cues or use follow as trigger time.
- F.C. Fade: Specify the fadetime for follow-cues.
- F.C. Name: Customize the follow-cue name. Use the placeholder “{name}” to integrate the original marker name.
- Use Semicolon (;) to split Cue Name and Cue Info: Split marker names using ”;” to separate cue names, adding the second part to the cue information or notes field.
- Add Release Cue to ‘Top’ Subtracks (using F.C. Time & F.C. Fade): Add a release cue to “Top” subtracks using the configured follow-cue time and fade settings.
- Limit color brightness for better visibility: This option limits the brightness of colors used for cues and subtrack buttons to enhance readability on the console.
- Replace Marker/Track Colors on Export: Use the color replacement table to change imported colors in the console to improve visibility or to match the console’s color scheme (e.g., using
#0000ffin Reaper but#003344on the console).
Table Fields
Section titled “Table Fields”- Cue:: The target cue number.
- Timecode: The timecode for the cue.
- Name: The label for the cue (or subtrack information where applicable).
- SubT.: The subtrack number.
- Fade: Describes the fadetime for the cue.
- Length: Describes the cue’s duration (time to next cue).
- Add F.C.: Add a follow-cue after the cue.
- Name + Length: Add length to cue label.
- Name + Timecode: Add timecode to cue label.
Advanced Functionalities
Section titled “Advanced Functionalities”Parameter from Marker Labels
Section titled “Parameter from Marker Labels”Some parameters can be set via marker name:
- Add Fadetime:
#Fxor#Fx.y(e.g., “Build #ff10.5”) for a 10.5-second fade - Add Fadetime to Next Marker:
#FF - Add Length to Name:
#NL - Add Timecode to Name:
#NT - Add Follow Cue:
#FC - Add Follow Cue (Override Timing):
#FCxor#FCx.yto set trigger time,#FCFto use follow - Override Cue Length:
#Lxset Cue Length to x.th next marker (defaults to 1 = next)
Ensure the ”.” is consistently used as the decimal separator.
The parameter is not case-sensitive (#FF is the same as #ff).
A space before # is needed for separation and readability.
Subtracks from Number-Only Markers
Section titled “Subtracks from Number-Only Markers”To create subtracks using this method, markers should be named with numbers only, such as “1”, “2”, “3” and so on. Naming is not possible to avoid confusion with normal markers.
Each number represents a unique subtrack, and markers sharing the same number will be grouped into the same subtrack.
Ensure the “Import Number-Only Markers as Subtracks” option is enabled during the import process to map the markers correctly.
For exporting, the “SubTrack Command” can be configured to “Top,” “Go,” or “On,” depending on the desired action for the subtrack.
This method provides broad compatibility across different software while maintaining a straightforward approach.
The created subtrack sequences are labeled using the format “TC#:ST#”.
For example, “11:2” represents the second subtrack of timecode 11.
Subtracks from Reaper Tracks
Section titled “Subtracks from Reaper Tracks”The Reaper-Track method offers optimal visibility and workflow when managing numerous subtracks.
This approach makes copying and pasting beat patterns significantly more convenient and visually clear.
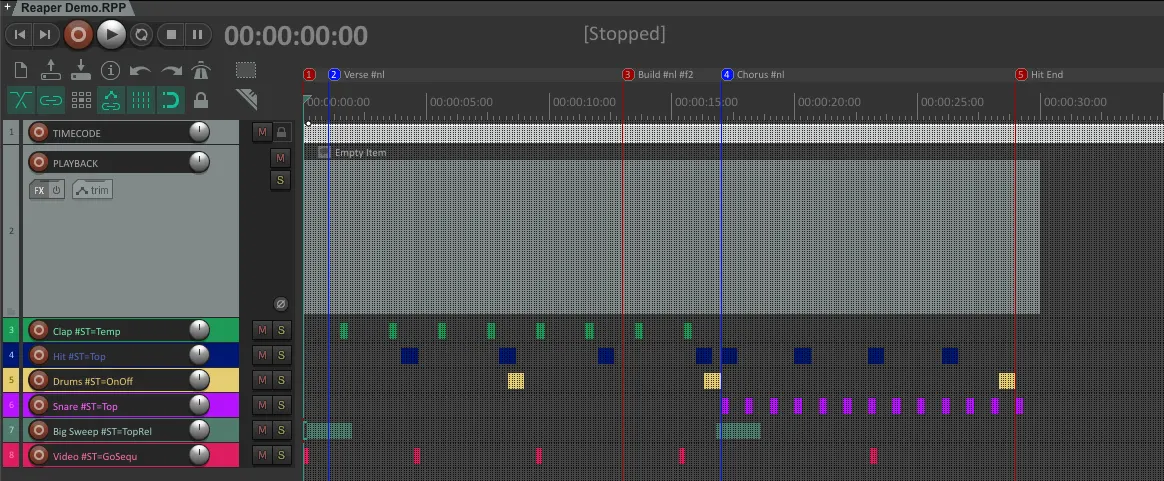
Download a Demo Project: Reaper_Demo_Project.RPP
To create a subtrack, add a new track in Reaper (Menu: Insert > Track) and ensure the subtrack’s name includes “#ST”.
You can also add a descriptive name, which will label the sequence accordingly, for example: “Clap #ST.”
Once the subtrack is selected, events can be added (Menu: Insert > Empty item) at current playhead position directly on the subtrack.
Each correctly labeled track will be converted into a subtrack, with all its track items treated as subtrack events.
The created subtrack sequences are labeled using the format “TC#:ST#” or “TC#:ST# Name”.
For example, “11:2” or “11:2 Clap” represents the second subtrack of timecode 11.
Additionally, the command for each track can be defined using the “#ST=” modifier:
| Command | Item Start Action | Item End Action |
|---|---|---|
#ST=Flash | Flash | Flash Release |
#ST=Go | Go | (length ignored) |
#ST=On | On | (length ignored) |
#ST=OnOff | On | Off |
#ST=Temp | Temp | Temp Release |
#ST=Toggle | Toggle | Toggle |
#ST=Top | Top | (length ignored) |
#ST=TopGo | Top (first item), Go (subsequent) | (length ignored) |
#ST=TopRel | Top | Release Cue |
You can also create entire sequences as subtracks. Each event will become an individual cue.
| Command | Item Action |
|---|---|
#ST=GoSequ | Creates a sequence triggered by the “Go Cue” command with a cue for each event |
#ST=GotoSequ | Creates a sequence triggered by the “Goto” command with a cue for each event. |
Optionally, you can use the Notes field in Reaper (by double-clicking on the event) to set the cue label or even the cue number. If the text starts with #x, x will be the cue number.
Example: #5 Chorus
You can reuse cue numbers to create repeating patterns like #1 #2 #3 #1 #2 #3.
However, ensure you don’t skip any numbers in your sequence:
For example, avoid using #1 #2 #4 #1 #2 #4 without including #3 anywhere in the sequence.
Note: Marker parameters such as Follow Cue or Fade do not work for subtracks.