
Patch Creator
Automate grandMA2 fixture setup by parsing My Virtual Rig (MVR), WYSIWYG, Depence or Excel tables into grandMA2-native patch, 3D coordinates and group generation.
Core Capabilities
Section titled “Core Capabilities”- Flexible Multi-Source Data Ingest
Import fixture data from MVR Files, Depence (R3/R4), WYSIWYG (R36+) or Excel. It supports source-specific settings, including custom fixture mapping (Spot, Channel, Unit, or Dimmer) and the ability to merge all dimmer channels into a single patch layer. - 3D Spatial & Patch Transformation
The core engine automates the translation of fixture XYZ positions and rotations into grandMA2-native data. All other necessary conversions, such as mapping alphanumeric universes (A-ZZ) to numeric values, will be automatically handled in the background. - Modular Macro and Group Output
Generate a Split-Macro system that allows for granular control over the import. Execute the full import, assign patch, move/rotate fixtures, or generate groups independently. Groups are automatically built based on various attributes including type, layer, position, or color.
Step-by-Step
Section titled “Step-by-Step”- Export MVR or CSV from Depence/Excel/WYSIWYG:
- MVR:
- Export MVR from your design tool.
(Unit: Millimeters, Coordinates: World, No Mirroring)
- Export MVR from your design tool.
- Depence:
- Open Windows > Fixture Manager > Update Patch
- Show important columns
(Right click “Fixture ID” > Column Chooser > Add all “Pos” and “Rotation” columns) - File > Export Table
- Excel:
- Prepare your data in Excel ensuring it includes necessary columns.
Download the template: XLS2GMA_CSV_Template.xlsx - File > Save As … > “CSV UTF-8 (Comma delimited)”
- Prepare your data in Excel ensuring it includes necessary columns.
- WYSIWYG:
- Open Data-View > Spreadsheet > “All data (sortable)”
- Show ALL columns in view
(Right click > View options… > Data View Options) - File > Export > Save as CSV
- MVR:
- Import CSV or MVR into the Tool:
- Configure import preferences, including ID-based sorting, filtering, and normalization.
- Customize source-specific preferences (e.g., WYSIWYG column mapping) via the Settings page.
- Use Import CSV or MVR File to import data from the exported CSV or MVR file.
- Setup Export Parameters:
- Set options for individual layers in the table view.
- Choose general export options.
- Export to Console:
- For manual import: Export the generated macros to a grandMA2 folder.
- Start automatic import: Send the macros directly to the console.
Select the first macro ID on the console (a popup window will appear).
- Import Layers and Fixtures:
- Start the first imported Macro “
NAME import layers” on the console to import the patch layers.
Select the drive where the exported setup was saved (should be 1 for direct console transfer or 4 in most cases if it’s on your USB storage). - In the “Patch & Fixture Schedule” window, import your chosen FixtureTypes and assign them to the fixtures.
- Start Macro “
NAME patch fixtures” to patch all fixtures.
Make sure correct FixtureTypes were assigned. - Start Macro “
NAME create groups” to generate groups based on your selection.
Existing groups were merged.
Make sure correct FixtureTypes were assigned. - Optionally, start Macro “
NAME move fixtures” to update fixture position and roatation.
Only if you want 3D positions to be updated without re-importing the fixtures.
- Start the first imported Macro “
Important Information
Section titled “Important Information”User Interface Guide
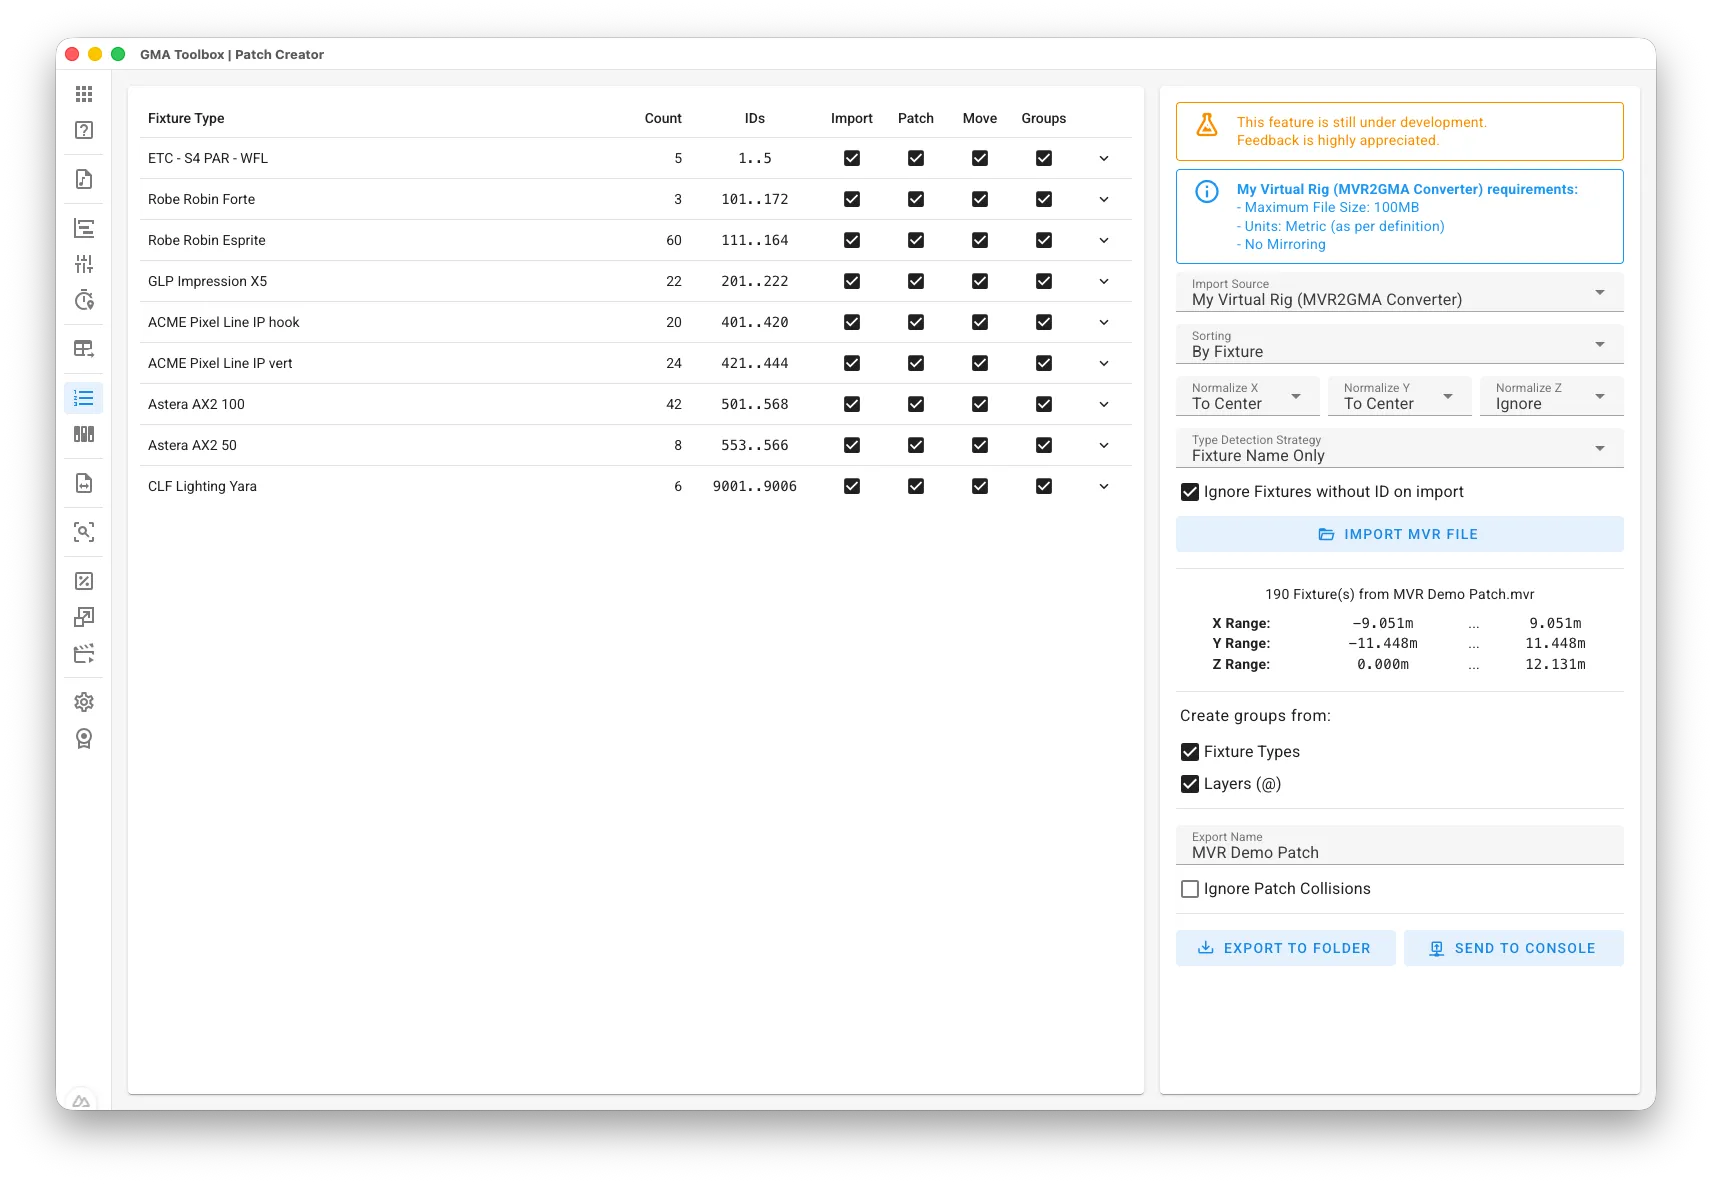
Section titled “User Interface Guide”Import Options
Section titled “Import Options”- Sorting: Sorts the imported fixtures based on their IDs or maintain original order.
- Normalize X/Y/Z: Normalize X/Y/Z position values in case there is a big offset.
- Ignore:
Use position value as imported. No normalization applied. - To Center:
Offset the position values to center them. Example: 280 to 320 will be -20 to 20. - Start From 0:
Offset the position values to start from zero. Example: 280 to 320 will be 0 to 40. - End At 0:
Offset the position values to end at zero. Example: 280 to 320 will be -40 to 0.
- Ignore:
- Type Detection Strategy: Determines how fixture types are identified during MVR import.
- GDTF Type (Name if Type is numeric or missing):
Uses the “GDTF Type” attribute, but uses the “Fixture Name” if the type is numeric or missing. - GDTF Type (Name if Type is missing):
Uses the “GDTF Type” attribute, but uses the “Fixture Name” if the type is missing. - GDTF Type Only:
Uses the “GDTF Type” attribute as the fixture type. - Fixture Name Only:
Uses the “Fixture Name” as the fixture type. - Fixture Name and GDTF Type:
Uses both the “Fixture Name” and “GDTF Type” attributes as the fixture type.
- GDTF Type (Name if Type is numeric or missing):
- Ignore Fixtures without ID on import: Ignores any fixture entries that lack a valid ID during the import process.
Export Configuration
Section titled “Export Configuration”- Ignore Patch Collisions: Forces the assignment of a DMX address even if it is already in use.
- Export Name: Set the macro name for export.
- Create Groups from: Create groups based on selected columns such as Type, Layer, Position, or Color.
Table Fields
Section titled “Table Fields”- Fixture Type: The fixture type from the list.
- Count: The amount if layer in this layer.
- IDs: The Fixture ID’s (
#) in this layer. Channel IDs are prefixed with aC. - Import: Includes this layer in Import-Macro
- Patch: Includes this layer in Patch-Macro
- Move: Includes this layer in Move-Macro
- Groups: Includes this layer in Groups-Macro
- ↓ Layer Name: Change the layer name.
- ↓ FixtureType ID: The ID of the grandMA2 FixtureType for this layer (needs to be imported already).